The tools required for this book include the .NET SDK, VS Code, and the C# extension
(a VS Code extension). In addition, we will also use the command line interface
(CLI, the Command Prompt in Windows or shell in macOS/Linux, or just “the terminal”)
for certain operations from time to time.
.NET (pronounced “dot net”) is a free, open-source, cross-platform framework developed and maintained by Microsoft. It provides the runtime environment, libraries, and tools needed to build and run applications on Windows, macOS, and Linux. Originally released as the Windows-only .NET Framework in 2002, Microsoft later rebuilt it from the ground up as the cross-platform .NET Core, which has since evolved into the unified .NET platform (starting with .NET 5 in 2020). Today, .NET is one of the most widely used application development platforms in the industry.
At the heart of .NET is the Common Language Runtime (CLR), which manages program execution — handling memory allocation, garbage collection, and type safety so that developers can focus on application logic rather than low-level system management. .NET also ships with a rich Base Class Library (BCL) offering thousands of built-in types and utilities for tasks ranging from file I/O and networking to cryptography and data access. Languages such as C#, F#, and Visual Basic (VB.NET), along with third-party languages, all compile to a common intermediate language that runs on the CLR, making .NET a true multi-language platform.
A software development kit (SDK) is a collection of software development tools in one installable package.
They facilitate the creation of applications by having a compiler, debugger and sometimes a software framework.
SDKs are normally specific to a hardware platform and operating system combination.
As part of the .NET SDK, the .NET runtime is a virtual machine that converts the compiled intermediate code into
machine code to be executed on the CPU. In addition, the .NET runtime provides an environment, that performs
services such as exception handling and garbage collection.
Having some knowledge of using the command line interface (CLI, often referred to as command prompt in Windows,
“shell” in Linux/macOS, or command line/terminal in general) is necessary when learning how to code. Major operating systems all have CLIs for users to interact with the operating system by issuing text commands in the terminal rather than using the graphical user interface (GUI). Different operating systems are shipped with different default terminal applications (or “terminal emulators” as they emulate the locally-attached dumb terminals in the old time).
When we open a terminal application, a default shell program is running as a command line interpreter program
that takes commands (therefore “command line”) from users for the computer to execute. The terminal applications can run
different shells and they work similarly. We use the shell languages to, e.g., move around the OS directory structure, manipulate files and folders, and manage software packages, etc.
OS
Common Terminal App
Common Shell Language
macOS
Terminal.app
Bash, Zsh
Linux Desktop
GNOME Terminal, Konsole, etc.
usually Bash
Windows
PowerShell, Terminal, Command Prompt (CMD.exe)
PowerShell, Batch
When you open the CLI application, you use the keyboard (without a mouse) to issue shell commands (note that in most modern systems, you can still use a mouse for highlighting and copy-n-paste). In the terminal, you see a shell prompt followed by a cursor (maybe blinking), which is where you type to issue your commands.
C:\Users\user_name>
user_name@computer_name:~$
For Windows users, you may issue wsl to switch from the default PowerShell to Windows Subsystem for Linux (WSL)
to use Bash as your shell. Your command prompt will change to user_name@computer_name:/mnt/c/Users/user_name$.
For the purpose of this book, you may use PowerShell and use the Bash commands with a slightly different interface.
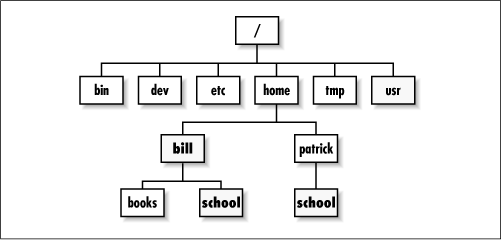
Unix-like OSs (such as Unix, macOS, and Linux) system are file-based, meaning the design principle dictates that
everything in the system is a file, and the files are organized as a tree-like file system structure. In the
command line, a file path is then used to specify the location of a file in a the computer’s file system structure.
The file system structure begins with the root (/), with a number of default first level directories representing the
functionalities. For example, oen of the first the default location after logging in is the user’s home directory, which is specified
as /home/USER_NAME.
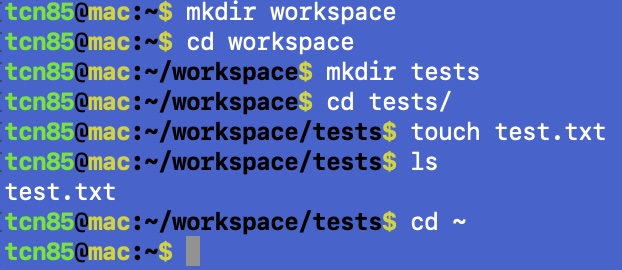
To create a project diretory and a test file, do the following:
Terminal application: Open your terminal app (Windows PowerShell or macOS Terminal).
Create directories:
Create a directory called workspace in your home directory (mkdirworkspace), then change directory into the workspace directory (cdworkspace)
Create a directory called tests in the workspace directory ((mkdirtests)), then change directory into the tests directory (cdtests).
Create a file: Create an empty file called test.txt (new-itemtest.txt for Windows and touchtest.txt for macOS).
Make sure the files is created: Use the list storage command (ls then Enter) to list the files to make sure the file test.txt is created.
Change directory to your user home directory: Change your location back to the user home directory (cd../..).
Exit out of terminal app: exit then Enter to exit.
The whole process should look similar to this in Windows:
PS C:\Users\[username]>mkdirworkspace### create the workspace directory in user home directoryPS C:\Users\[username]>cd workspace### change directory into workspacePS C:\Users\[username]\workspace>mkdirtests### create the tests directoryPS C:\Users\[username]\workspace>cd tests### change into the test directoryPS C:\Users\[username]\workspace\tests>new-itemtest.txt### create an empty file; use "touch test.txt" if you use macOS.PS C:\Users\[username]\workspace\tests>ls ### list storage to see the filetest.txtPS C:\Users\[username]\workspace\tests>cd ../..### change to the upper directory twice to user home directoryPS C:\Users\[username]>exit### exit --> Enter to leave the terminal
If you use macOS, the process should look similar enough:
Fig. 1.6 Creating a workspace directory, tests subdirectory, and a test file in macOS.#
Note that:
To rename a file or a directory, use the mv (“move”) command. For example:
mvist_1551introcscs will rename a folder called ist_1551 to introcscs.
To remove/delete a file, use rm*file_name*.
To remove an empty directory, use rmdir*directory_name*.
To remove a directory and all its content, use rm-rf*directory_name*.
Integrated development environment (IDE) applications play a critical role in software development workflow and
usually contains tools such as source-code editor, build automation tools, and a debugger.
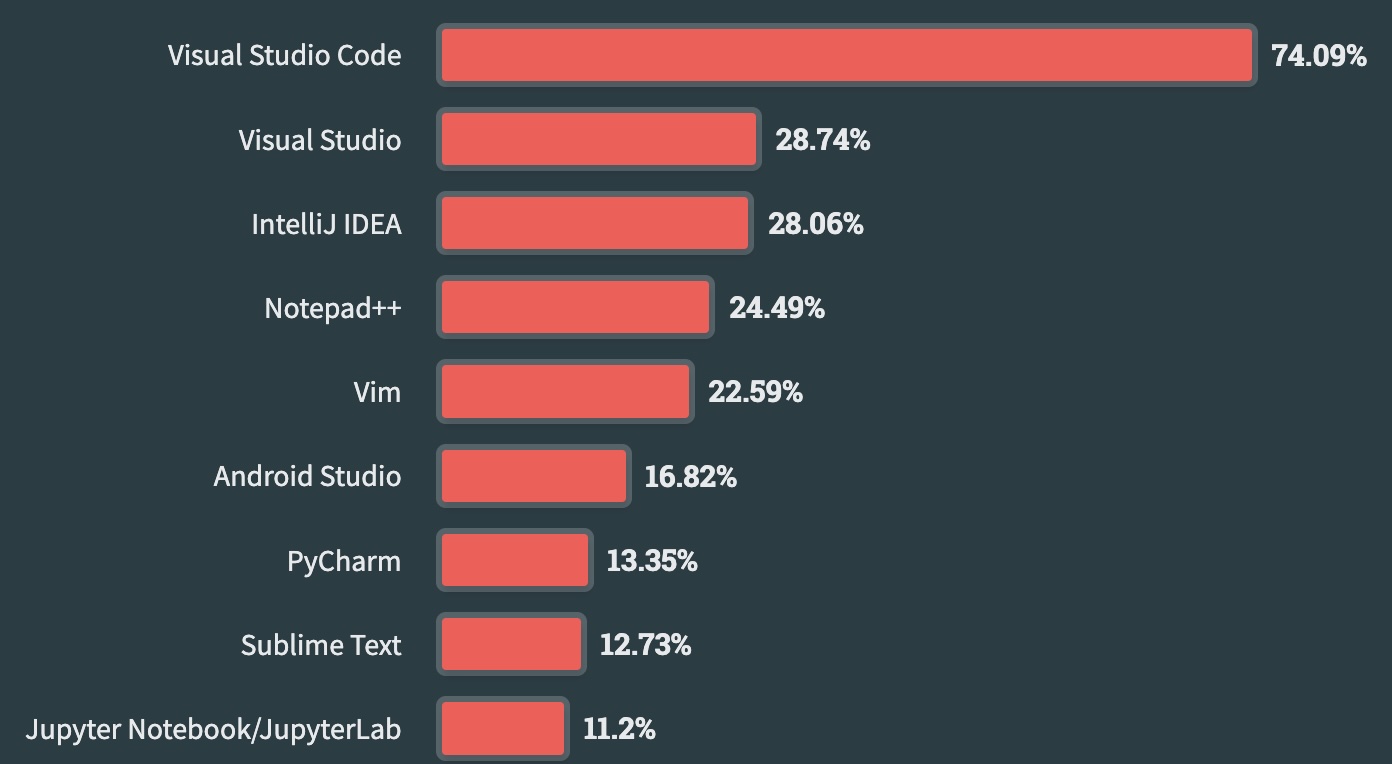
IDEs commonly used by professionals developers are: Visual Studio Code, Visual Studio, IntelliJ IDEA, Notepad++, and Vim.
Visual Studio Code (VS Code) is an editor with plenty of features. It has turned from a text
editor into an integrated development editor (IDE) with a large number of
extensions available to enhance and enrich its tools and features. A great advantage of learning
VS Code is that it is extremely versatile. Once you learn how to use it, you can use it for
almost every other programming languages and technology as long as they involve editing and coding.
Fig. 1.7 Visual Studio Code remains the preferred IDE across all developers. [1]#
The Visual Studio Code (VS Code) editor, powered by plenty of extensions, has made the editor a very powerful tool for coding and programming and worth learning.
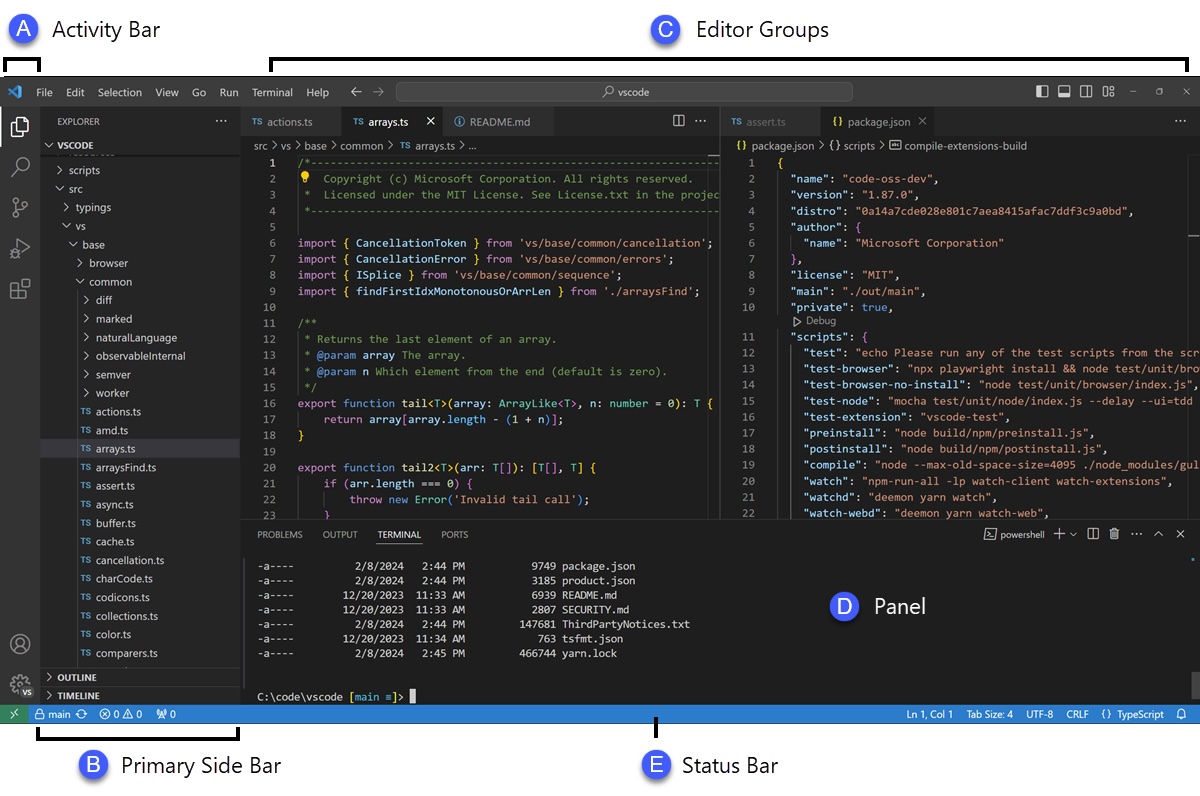
The popular IDE/editor VS Code user interface include several panes:
Activity Bar - Where you change Views. For example, the default view is Explorer () for managing files.
Primary Side Bar
Editor
Panel (toggled by where TERMINAL resides)
Status Bar
Activity Bar: In the Activity Bar on the left of the window, you can access different
Views such as:
Search - Provides global search and replace across your open folder.
Source Control - VS Code includes Git source control by default.
Run - VS Code’s Run and Debug View displays variables, call stacks, and breakpoints.
Extensions - Install and manage your extensions within VS Code.
Custom views - Views contributed by extensions.
Fig. 1.8 Basic elements in VS Code user interface#
Terminal: In the Panel section (), you have access to the TERMINAL and other console tabs. Note that:
The TERMINAL is exactly the same as your terminal application.
When you open a project by issuing code. in the project directory, the terminal will be default
to the project directory.
You may use Cmd+J (Ctl+J) to toggle the Panel to use the terminal.
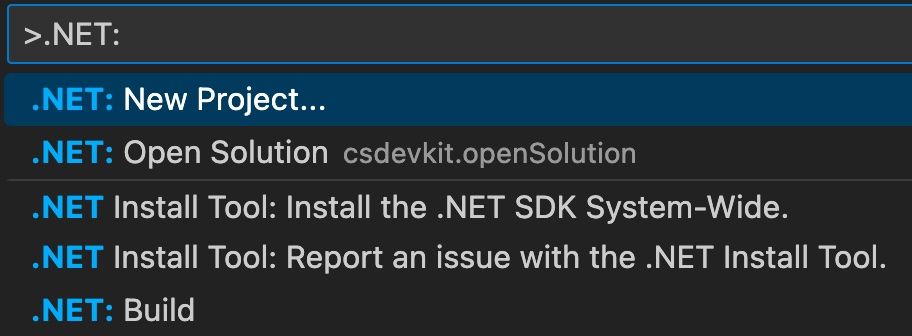
Command Palette: In addition to the UI elements, an important key combination to learn is
Ctl+Shift+P on Windows and Linux, or Shift+Command+P on Mac. Command
palette gives access to all the functionalities within VS Code. For example,
if you type .NET at the command palette, you get to access the .NET commands
and features as follows.
While VS Code and .NET templates have made coding C# easy, a REPL (Read–Evaluate–Print-Loop, or language shell/interpreter) provides immediate evaluation (execution and result return), which can be very useful as you get to see immediate feedback of your code. This means direct execution of C# code without creating projects and files, which is very handy for learning and testing syntax.
Installation: CSharpRepl can be installed by issuing dotnettoolinstall-gcsharprepl at command line.
Invocation: CSharpRepl is invoked by using the csharprepl command at command line.
We want to use start by using csharprepl so that we can run some
quick-and-dirty C# code for practice and testing purposes.
PS C:\Users\[username]\test>csharpreplWelcometotheC# REPL (Read Eval Print Loop)!Type C# expressions and statements at the prompt and press Enter to evaluate them.Type helptolearnmore,exittoquit,andclear toclear yourterminal.>
The > prompt tells you that the C# interpreter has started and is awaiting input. This allows you to test C# code interactively without having to create a project, modify it, save it, and run dotnetrun to test it.
When you are done with csharprepl, you can enter exit to quit the shell.
The repl part in csharprepl is an acronym for the Read-Evaluate-Print Loop (REPL). A REPL is a language shell provides simple interactive computer programming environment that runs code piecewise. It evaluates expressions immediately and prints the result on a line without a prompt. The REPL can evaluate arbitrary C# expressions. It is very handy for testing as you get used to C# syntax.
There are plenty of development tools that are worthy of our time to learn, except that we would
not be able to learn all of them in one semester. A short list of those tools would include: